
Note: This article was originally written about film photography but I have expanded it to include the digital photography I now use.
I include both because a lot of artists have not switched to digital...but I sure do recommend the new technology!
I've always loved the paintings of the Old Masters and often have copied their works in order to understand the masters' use of light and composition.
Their lighting is simple, elegant, and comes from a single light source. Over the years, I've devised a method of achieving this single source lighting with the use of my camera and artificial illumination equipment.
Because I personally find a natural daylight source to be inconsistent and often paint into the night without a model, I heavily rely on my camera for reference "notes".
I've found that it is difficult, if not impossible to produce a good portrait from a poor photograph. For example, shadows that look wonderful when you have the model sitting before you, can unhappily appear as solid black in the resulting photograph.
Traditional photography can tend to clump and exaggerate values on both extremes of the value scale – shadows become dense and “black” and highlights often become burned-out and pure white.
My goal is to take the best photographic reference possible in order to see into dense shadows and compensate in painting by consciously making shadows luminous while retaining detail in the light.
Another inferior result comes from the use of high-speed film in low light, making the photo grainy. There are two variables that determine how much light intensity is needed - lens aperture and film speed.
The faster the film speed and the larger the aperture setting, the more grainy and inferior the resulting photo. What a portrait artist needs is sharp, brilliant pictures with good depth of field. The only way to get this, especially with moving children, is to have lots of steady light, a slow speed film, and moderate or high apertures.
The placement of the light in relationship to the subject is critical. As a rule of thumb, when photographing most clients, I set up my light to the left of the camera and above the subject. This placement will produce shadows appearing in a pattern that photographers call, "Rembrandt Lighting".
Since paintings, like books, read from left to right and top to bottom, this direction of light is oftentimes the most pleasing. With older clients, I like to keep the lighting as frontal as possible in order to minimize the appearance of creases and wrinkles on the skin.
To reflect light back into the shadow slide of the model (so that the shadows don't look black in the resulting photo), I place reflectors (white cardboard will do) opposite the light source and "off camera". Bounce more light than your eye tells you to back into the shadows, so that you will be able to see detail within the shadows.
Most professional photographers use another light to accomplish this, but I urge you to resist the temptation. I find that the results can be excellent when served by a single light source and a reflecting board.
I often photograph my subject with a neutral background. My discovery of a portable "Background System in a Bag" by Photek, makes traveling to the client's location a breeze. It consists of a large, 8'x12', pearl gray material with collapsible supports. In composing the actual painting, this neutral background allows me the flexibility to add objects or landscapes that I've photographed separately.
In my old film camera, I prefered a slow (160 ISO) professional film, Kodak Portra. It is a professional film that gave me accurate skin tones, clear detail, and soft shadows.
I now use a 35mm Nikon D2X digital camera (auto focus) with a Nikkor 24-120mm zoom lens. This digital camera works beautifully with all of the equipment listed here.
There are many advantages to using a digital camera nowadays – the technology has advanced so that it rivals film quality and is much less expensive as there are no film costs. It allows the photographer to “process” and adjust the photos at home on their own computer and make their own quality prints.
The "White Lightning Ultra 600" studio flash manufactured by Paul C. Buff, Inc. of Nashville, TN., illuminates the subject while showing exactly where the shadows fall. It is lightweight and portable, and allows me to shoot at a faster speed, thus eliminating the absolute need for a tripod. I have found that it is essential for me to have this kind of a strobe light in order to be able to photograph a small child who cannot be expected to sit still.
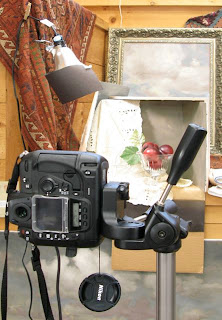
This picture (above) shows how I shoot a still life for reference with my digital camera. I am not using a strobe because it is unnecessary as nothing is expected to move. I am using an ordinary hardware store bulb and fixture - the digital camera will automatically compensate to make the color temp appear "normal."
Without a strobe light, it is often necessary to use a sturdy tripod in order to get sharp clear and perfect focus prints.
I find that a light modifier provides light that wraps gently around the form. I use the Apollo 28" square model with a recessed diffuser panel. It is manufactured by Wescott and attaches to my studio flash unit like an umbrella.
I also use a Wein light meter (any will do) to determine the aperture on my camera. When I click the shutter, a strobe ring at the base of the modeling light automatically flashes and illuminates the subject with the correct amount of light.
With my digital camera and when I am shooting in my studio, I do not use the light meter – instead I use the computer to “see” what adjustments may be necessary in my lighting and set up.
It takes time, study and practice to produce beautifully lighted photographs for use in portraiture. My system has worked well for me to mimic the single light source.
Resources
Studio flash unit:
Paul C. Buff , Inc.
www.white-lightning.com
All other equipment, both new and used:
B&H Photo
www.bhphotovideo.com


2 comments:
Hi Karin,
As you suggested I am avidly studying photographic lighting.
I need one light source strong enough for head and shoulder that can also softly fade down a full length dress should I need it to..
I have been looking at a cool florescent daylight and stand with 4 150, or 250watt bulbs - it has a 44 x44 inch soft box. Some of these light can be off or on. Britek Pro 5000 produce these and sell them on www.lincoinc168.com
Firstly, do you like florescent for portrait photos?
Secondly,in your use of florescent would this light source be powerful enough - as it is not a strobe - whatyou see is what you get.
Thirdly, I would think it would be easier to concentrate on composition, expression if one is not messing with lighting connections and strobe. Would you agree?
Would you advice that at 30 lbs it might be too heavy for taking on location?
Still lapping up your teaching and loving it.
Best wishes
Vanessa Morris
All good questions.
You'll find my answers here:
http://karinwells.blogspot.com/2009/03/some-lighting-q-and.html
Post a Comment