Showing posts with label How to manage edges. Show all posts

Sfumato

Sfumato is the term for the blending of colours or tones so subtly that there is no perceptible transition.

Pronunciation: sfoo.mah.toe


When I saw the Mona Lisa being displayed in the Louvre, it was under tight security.

In fact, with the crowds and security I could hardly see this painting at all. Darn it.


But the most wonderful example of sfumato can really be seen in Leonardo's Mona Lisa.

And I'm sorry to say that I can see it here on this blog more easily than in person.


In Italian, sfumato means "smoky" and is derived from the Italian word fumo meaning 'smoke.'

Leonardo da Vinci described sfumato as "without lines or borders, in the manner of smoke or beyond the focus plane."


There are NO hard edges in nature!


Areas blend into one another through miniscule brushstrokes, which makes for a rather hazy, albeit more realistic, depiction of light and color.


Sfumato is a painting technique - not necessarily a technique in drawing as seen in the hard and soft edges of Leonardo's self portrait in sanguine chalk (above).


This photo was taken during X-ray fluroscence spectrometry directly on the painting at the Louvre.

In response to an interesting comment below I posted this additional photo (above) as a good example of both hard and soft edges in one painting.

Hard and soft edges are relative:

When I said that there are no HARD edges - what I meant was that if you look at an old master painting with a magnifying glass, the edge of the object turns in space and is "lost" into the background. There is no EXACT place that you could pinpoint where the edge separates from the background.

A softer edge is why an oil painting looks so very different than a cutout paper glued onto a background - with no blending of the edges.

HOW

Painted edges can be either "hard" or "soft"....but even within the "hard" edges - they are (maybe even microscopically) "soft." It is the nature of oil paint to do this when a brush is dragged between two wet edges. When you're painting an edge on a dry area of a painting - it is a good idea to re-wet the dry area (be sure to match the paint exactly) and get that edge blended (choose hard or soft - but choose).

WHY

I find it beautiful when the artist "pushes the edges" in both directions in the same painting for contrast. If DaVinci does it - you can too - and it will give your painting that Old Master's touch.

You can see a "hard" edge in the veil - the veil becomes a "hard edge" compared to the sufmato edge - but it is still a "soft edge" as compared to a cutout-and-glued-on edge.


Detail showing contrast between "hard" veil edge & "soft" cheek edge.

Student Critique - Lessons in Light and Shadow


"I always paint what I know and not merely what I see."
Karin Wells

I am so grateful to have permission to use a student work to critique in order to illustrate a couple of the fundamental principals of painting. 

This is NOT a critique of the drawing - that is another subject. But you can see how easily the drawing will be to correct when the principals of light and shadow are correctly applied.

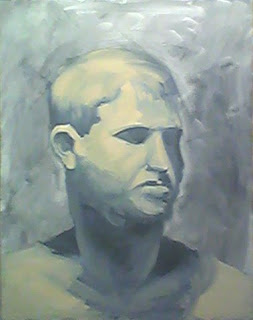
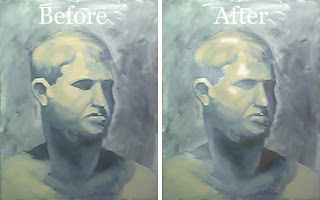
THE ORIGINAL STUDENT WORK:


This is the original work - a quick life study in warm and cool. The student used Payne's Grey, Raw Sienna and Titanium White.

WHEN A SHADOW FALLS ON THE LIGHT SIDE IT WILL BE LIGHTER:


This is a hard one for most people to understand so I'll try to make the steps duck-soup simple.

Each object has a shadow side and a light side. 

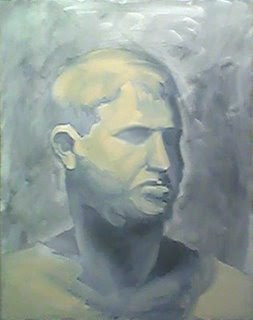
So I added a shadow to the shadow (right) side of the forehead where there was none. 

Because the light comes from the upper left, I lightened the dark shadow on the shoulder on the left...because, given the light, I didn't think it could have been a dark "cast" shadow.

IMPORTANT: When a shadow appears on the light side of an object it will appear lighter than any shadow on the shadow side of the face (as illustrated with a heavy hand above).

Accordingly, I lightened the left eyesocket and all down the light (left) side of the face and neck.

IMPORTANT: No shadow ought to dramatically disrupt the flow of light on a lighted plane. Or, the light will illuminate whatever shadow it surrounds.

WHEN LIGHT FALLS ON THE SHADOW SIDE IT WILL BE DARKER THAN ON THE LIGHT SIDE

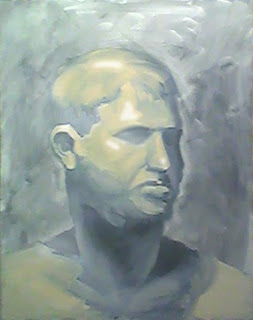
So keeping this in mind, I darkened both the light that fell on the cheek on the shadow side of the face and the light on the lip as it entered the shadow side of the face.

The value of light and shadow areas are not equal and are determined by where they fall. 

HIGHLIGHTS ARE COOL:


Highlights need to be cool. The term "warm and cool colors" are relative - often determined by what surrounds them.

The general light is always warm and the student got it correct here. However, highlights are always lighter and cooler (as added to the original pix above via Photoshop) and it is the layering of warm and cool that will create form.

IMPORTANT: It may help you to think that a highlight will reflect the white light of the sun.

CAST SHADOWS ARE WARM (you can make them colorful and hot):


Deep shadows (aka, cast shadows) are warm - and if you make them hot - they don't even have to get too dark. I added a little orange into the deep shadows above to illustrate this. 

Warmth can be glazed or painted thickly. Sometime a thin (subtle) glaze of cadmium orange will breathe a little life and fresh air into a dead dark shadow. 

If I were correcting this painting with real paint I would use a glaze of raw sienna to warm up these cast shadows (eyesocket, bottom of nose, and under the chin on the shadow side of the head).

LOSE AND FIND EDGES (shown above)

All the edges on this original work are "found" so I "lost" a couple of edges when I changed the light/shadow ratios to facilitate the integration of background and foreground. Adjusting the  value of either the background or the foreground is a good way to "lose" an edge.

 The student can correct this with a brush with a heckuva lot more finesse and subtlety than I have with my clumsy Photoshopping efforts.

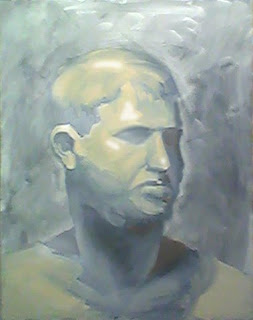
BEFORE AND AFTER COMPARED:


See how much more "sculptural" this painting has become? It suddenly appears as if the drawing has been "corrected" - but it wasn't (you saw exactly what I did, eh?).

Merely following some very basic principals of light and shadow will go a long way to painting more accurately (and certainly more easily).

Painting is Duck Soup Simple when you know how.

"Knowing what you're looking at makes painting so much easier."
Karin Wells

How To Turn An Edge


To make your painting look "real" you have to create the illusion that the edges of objects turn back into space.

Think of a landscape with "blue" mountains in the distance. The further away from the eye an object is, the cooler (bluer) it gets.

It doesn't matter if the object is close and small and not very deep - the principal is the same.


The edges (above) are not turned. I saved them for last so I could show this mini-demo. I usually turn an edge as I paint.

Edges must be "cooled" in order to turn. It is usually so subtle that it isn't easily seen but your brain will suddenly recognize the realistic look of a three-dimensional form. 

But if you don't turn those edges, the object will look like a cutout pasted onto a flat surface...and it won't look like a believable realistic form.


The edge of the sleeve in the photo on the right is not turned yet. 

The left side shows a turned edge. Because it is so darn difficult to photograph and see on this blog, I  had to enhance the process with Photoshop.

You can use several methods to turn an edge. 

Add a thin cool blue glaze...enough to fool the eye but not enough to add color. I've seen Velazquez do this.

OR

When the paint is still wet on the object you're painting, add a dab of ivory black (or blue) to cool the object's edge and it will magically turn back into space.


The edges of all the objects (clothing, folds, hands, legs, hair, etc.) in this painting have been turned. 

It is tough to see here but the effect is almost magical when you're standing in front of the painting.

I really think that the Old Masters are ultimately the BEST teachers of realistic painting. When you know what to look for, you will be able to see it. 

MY BEST ADVICE: Take a trip through any good museum and observe how many different ways the Old Masters used to turn those edges.


Edges


An accomplished painter knows how to manage edges effectively.

Edges occur wherever shapes meet.

They can be hard or soft, lost or found.


Hard edges are clean and crisp and draw attention. They can be the center of interest as shown by the hard edges in the face in this portrait drawing by Ingres. 

The "less important" edges of the clothing and chair at the bottom are soft and do not draw the eye away from the face.


Soft edges can help integrate a background and foreground objects. Where does the hair end and the background begin in this portrait by Ingres?


Edges get lost when adjacent shapes are similar in color or value, i.e., the boundary between the coat collar and the portfolio "get lost" in this portrait by Ingres. 

Other edges of the collar and portfolio can be "found" again when it becomes dissimilar in color or value. Can you see how the manipulation of the edges here is a huge compositional element that makes this painting so successful?


My apologies to Vermeer for writing on his painting of "The Milkmaid." But in each of Vermeer's paintings, you can so clearly see how his hard edges "spell it all out." and his soft edges merely - but beautifully - "suggest."