
Sometimes I start a portrait "as flat as a pancake." Here's a peek into my process.

This is my finished portrait of Annie (above). It is 16" x 20" - oil on linen and I'll bet that you cannot see the "pancake here."
One day I happened to come across a poster of Michaelangelo's "Manchester Madonna" (below) and the light bulb came on :

And suddenly, the "Pancake Method" began to make sense. Thanks Michaelangelo.

This is the "pancake" that is underneath my painting of Annie. I wanted to establish and fix the composition and account for all of the colors (red, yellow, blue, black and white). Needless to say I did a drawing before I started the "pancake."
Flat Color Notes:
"Black" is a color I mix from burnt umber + prussian blue.
The "blue" sky is a mixture of ivory black + titanium white.
The hair, skin and white sweater are a mixture of raw umber + white (all the same value in this portrait). Had Annie been a woman of color, I would have used the same colors - but made the skin and hair a darker value (i.e., less white).
The "red" (I'm going for pink on the scarf) is burnt sienna + a touch of alizarin crimson permanent + white (with enough raw umber to dull it all down).
"Yellow" is a a mixture of yellow ochre + raw umber.
I often use these basic earth colors to establish nearly all of my color in the first layers....no matter whose portrait it is.
Only if you are working on an acrylic primed canvas, you have the option to use "Liquitex's Opaque Acrylic Color Matt Basics." The oil paint must "grab" the acrylic layer beneath or the painting will not be archival. Sometimes I lightly sand the dry acrylic surface to help the oil paint "grab." Even in Acrylic paint, I stick to an earth palette.
However, I mixed oil paint for this painting and in places, it took a couple of layers to cover to make it as "flat as a pancake" - as shown above.

After the "pancake" stage, I begin work on a dry surface.
If the surface is acrylic, I will cover it with Liquin and let that dry before I begin with oil (to ensure a good bond).
No matter how I paint, I begin with the background.
I glazed over the "brown frame" with raw umber and then used a paper towel crumpled up and dipped into yellowish-brown paint. Then I "fuss around" with a brush for a minute or two and this part is done.
I match the paint in the sky and then paint clouds into the wet surface. (I use a touch of raw umber + white to make those clouds.)
Then I blend the gold into light and shadow on the oval and begin to build some light on the shoulder and scarf.

I draw on the dry surface with chalk and mix thick paint to establish light and shadow and then begin to define the shadow patterns....an important element of composition.
Although my finished work doesn't look like I've piled on the paint - I do.
I learned to "always paint with a quiet brush." If your brush makes noise - you haven't got enough paint on it. Seriously.

Here's a detail above before I begin to blend light into shadow. I paint right over my "chalk" guidelines. I used a soft white pastel and it just blends into the wet paint.

This is light and shadow blended. Where light and shadow meet is called the halftone. The light can turn quickly or slowly as it moves into shadow to define the form.
I pay a lot of attention to the halftone and try to keep my shadows light and luminous (even though it never looks this way in a photograph).
About Skys:
In general, the sky is darker and cooler at the top and lighter and warmer near the horizon. Prove it to yourself - go outside and look up. You can exaggerate this fact in a painting to "fool the eye" make it look more "real."
Clouds are larger near the top (closer) and get smaller as they approach the horizon (farther away).

After light and shadow are blended, I use chalk on paper under an acetate drawing to transfer the features. Then I "draw" them in using raw umber and Liquin.
Features need to be accurate at this stage (in size, placement & shape) but it isn't necessarily a likeness - yet (above).

After the initial raw umber "draw in" of features, I allow the surface to dry and then glaze raw umber over all. This will both unify and "warm up" the surface.
When this is dry, I continue drawing with raw umber on my brush until I get a likeness - or close to it (above). Note that raw umber is a glaze color and must never be applied thickly.

Yikes! I looks like I wrecked it - but I haven't. Trust me.
Beginning on a dry surface, I scumble (explained here) the skin color (raw umber + raw sienna + white) and glaze the hair. Into the wet glaze on the hair I begin to build light.
Note that I can see through this scumble layer so I haven't "lost" anything despite the "shock" of the way it looks at this stage.
NOTE: Building Light with Karin's Universal Color of Light:
Winsor Newton's Yellow Ochre Pale + white. If it looks "chalky" I add more yellow. If it looks too yellow - I add more white. I do not know if this "light" works with other palettes - but it sure works with my palette.

After the scumble is dry - I can still see the raw umber drawing underneath - so I "draw in" another layer - still aiming for a likeness. I work scumbles and drawing in layers...until it "looks right."
Note that when the paint is wet I work in my color banding.

The portrait needs some pearls but, per usual, I painted what was underneath first. (If you want to lose your mind - try painting the neck around pearls - HA).
In order to get the pearls round and uniform - I used one of those plastic round brush tops and dipped it in a mixture of raw umber and white and "stamped it on" (above).
Note: I could have used an eraser on a pencil, a soda straw, etc.

I finish the pearls (and turn the edge on each one). Then I build light on the scarf while the pearls dry.
When ALL is dry I quickly turn any edges I didn't turn earlier....to hide the "pancake" so Annie will not look like a cardboard cut out.
There are several ways to turn an edge so an object will look three dimensional:
First, when the paint is wet, the edge can be cooled with a dab of ivory black on the edge and blended in so as not to show.
When the object and the background are both wet, the paint can be slightly blended together if the effect is to "cool" the edbe of the object in front.
If you're in a hurry, you can take a light glaze of blue (I use French Ultramarine) to cool the edge. You have done it right if the blue doesn't show - but the edge "magically" turns back into space.
NOTE:: It is important to "lose and find edges."
All the edges on "a pancake" are "found" so it is nessary to "lose" some edges to make the painting "hang together."
I changed the light/shadow ratios to facilitate the integration of background and foreground. Adjusting the value of either the background or the foreground is a good way to "lose" an edge.
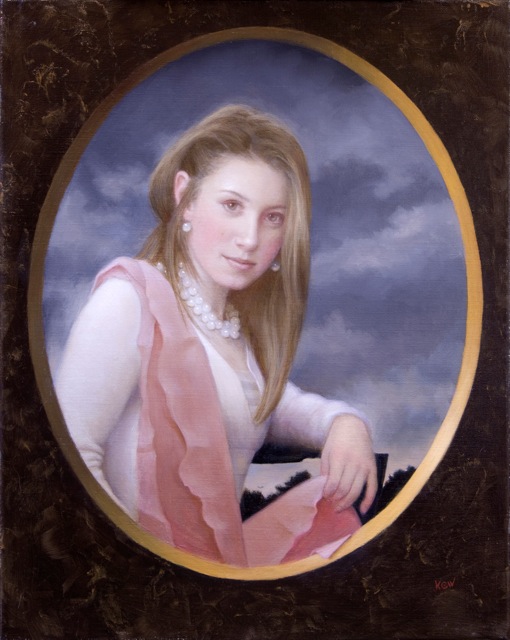
Here is Annie again (with a "pancake" hidden beneath it all).
And here is a peek underneath yet another (pancake) portrait I painted:

Above is the "flat as a pancake" beginning. I used acrylic on this canvas and the "pancake layer" you see is only partially done.
When a portrait is large and complicated, I like to use acrylic because I want the option to paint light over dark. This works because the acrylic paint I use is completely opaque. Oil isn't opaque and doesn't work that way.
Note:
You can paint acrylic over acrylic - and oil over acrylic - but you can never ever ever paint acrylic over oil paint. Don't even think about it....unless you like paintings that self-destruct.

Here is the same portrait finished. The "pancake" first layer doesn't show does it?
I kept the colors in the same family - but changed them all with glazes and scumbles to look more "Old Masterish."
So what makes me decide to use the "Pancake Method" in a portrait? When I am looking through my reference photos and composing the painting, I am only thinking of the final result.
Lately I am more and more beginning with the "pancake." It is important to establish a strong abstract design first and foremost. It is all to easy for me to get lost in the "reality" of a painting and fail to establish a strong composition.
The pancake is devoid of reality and forces me to deal with negative and positive spaces and the overall placement of areas of color. I can add and subtract space at this stage and force "reality" to bend with me to build a more solid painting.
For example, in Annie's portrait above, the hair in my reference photo fell straight down on both sides. In the pancake, I gave it a more "interesting" shape to interact with the background for the sake of the composition.


2 comments:
Thanks so much for your blog. I am thoroughly enjoying it. So much so that I have taken the plunge and begun trying to use some of your tips (I had never tried a portrait before). I've certainly had my problems, but I think I'm making progress. Being new at this, I find myself with questions.
When you scumble is it strait paint or do you use a medium? And your glaze (as described above), what is your mix? Just liquin?
Thanks in advance! I've been glued to you blog since I found it. Your work is amazing! If only some of your wisdom could find itself on a canvas of mine!!!
A glaze is made with transparent color + medium - like raw umber, burnt umber, etc. You can look up my palette and read about what colors are transparent and what ones are pigmented and opaque.
A scumble is made from an opaque paint - like titanium white - and Medium is added to this paint and it becomes "milky"
There are longer explanations on this blog. :o)
Happy painting!
Post a Comment