
There's a Zen to painting in layers.
You have got to enjoy the process or this isn't the method for you....(but don't worry, there are lots of ways to paint a portrait & get a similar result). Personally I like any way that is easy. And this is pretty easy - but alas, it isn't fast 'cause you just have to wait for those layers to dry before moving on.
"It is good to have an end to journey toward, but it is the journey that matters, in the end."
-Ursula K. LeGuin
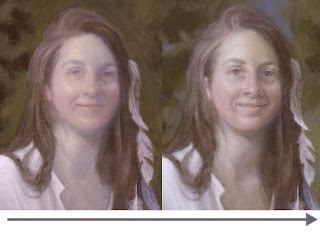
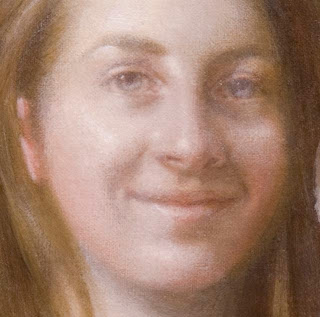
On the left side is a picture of the last completed layer (uncorrected).
On the right is the current layer (uncorrected).
That short journey from left to right is the subject of this little mini- demo on how to paint a layer on a face. (Of course, the same process works for hands, feet, all skin showing).
I use this method (multiple layers) to build light and form in small increments in order to get the luminosity of the Old Masters.
The more layers I paint - the more luminous it gets.
This example is only one of the many "middle layers" and merely illustrates a small (and relatively easy) step that goes into painting a portrait.
This particular face is small, only 3.25 inches high and this entire layer (shown) here only takes me half an hour (more or less). It is a lot easier and faster than it looks - really!
The hard part is waiting for my paint to dry so I can begin to build the next layer.
While I wait, however, I work on background, clothing, props, other paintings, this blog, run errands, eat lunch...you get the idea.

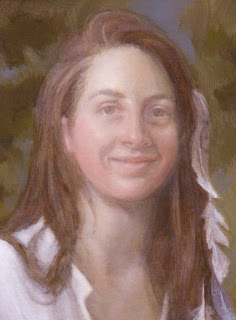
This is the corrected face from the last demo on losing/finding a likeness. It is now ready for yet another layer.

I begin by reinforcing the lights (Titanium White) and the darks (Raw Umber thinned with Liquin) to increase the contrast. I try to avoid hard edges in this.
I let this dry thoroughly (i.e., overnight).

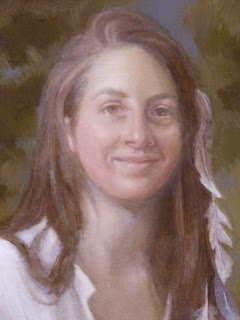
This is the palette I use in a layer. It does not matter if the skin tone is light or dark...the colors are the same but obviously the values will be different.

I mix/match the approximate skin tone (raw umber, burnt umber, raw sienna, titanium white), mix it with Liquin and scumble it over the entire face.
Note that my paint is never so thick that I cannot see through it to the layer below.
See why I reinforced the darks & lights to bump up the contrast?

Into the wet surface, I add color. See my demo on Old Master Color Banding in Portraiture for particulars.

I blend those colors in.

This is how I mix "The Universal Color of Light."

I use this "Universal Color of Light" to build light on the face (or just about anywhere).
If the light looks chalky, I add more yellow.
If the light looks too yellow, I add more white.

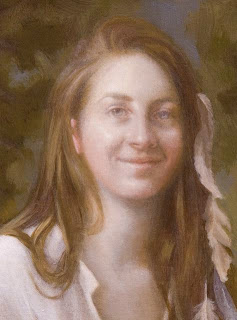
I continue pulling the light down into the face. I am only working with light - not color.

I continue adding light. I locate and reinforce the centers of light with thicker paint.

I add more light, work it in and let the light build and define the form.
I continue to define the form with light.

I add even more light into the centers of light (as defined by the highlights).

I work this light in and build form. I allow the light to go into the hair.
This layer is done and it must be allowed to dry thoroughly.
I did correct the above pix, then went on and painted the next layer below.
ABOVE: Here is a peek at the next layer (uncorrected as to likeness, without a skin tone glaze and ill-defined features). The light is now so thick you cannot see the weave of the canvas through it. I've started to work on the hair. I wish this photo wasn't so small - it is really quite a jump forward.
This is a detail. You can see the color locked underneath as I build light on this face.
Next:
*
I'll correct the likeness and define the features with raw umber and let it dry.
*
Next I'll glaze this back into a skin tone and let it dry.
*
Then I'll match a scumble to the skin tone and work color (bands) into the face
*
I'll let this dry - and repeat the process if necessary.
Considering how "unfinished" this stage looks right now, it is relatively quick and easy to transform a face with several layers of light into a finished face.
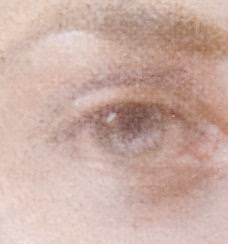
This is a detail showing how the light flows over the face with what is underneath still being visible. Do NOT paint around features like eyes, eyebrows - and don't be afraid to paint over the entire face in order to define the light. It is the paint that shows through that gives a painting its subtle beauty of form.
NOTE: I usually do the face LAST as the skin tones are really determined by what surrounds it (i.e., the background). So I'm going to stop working on the face now and bring the rest of this painting into being before I get all the color into this face.
I just keep repeating this entire layering process until the face tells me when it is time to stop and finish.
"Everything the same; everything distinct."
- Zen Proverb


5 comments:
Hi Karin - I found your blog as a result of an email that made it's way amongst Portrait Society ambassadors. Count me as a fan! Can't wait to get back to the studio tomorrow and give the color banding a shot on a piece I started this week. And the acetate overlay to re-find a likeness is BRILLIANT! Thanks for taking the time to post such good information!
Terry
(Wis. PSoA ambassador)
Welcome art lady from the Portrait Society of America - I am a founding member of that wonderful group and enjoy sharing what I've learned via this blog.
Tell everyone to drop by and say "hi."
Thanks so much for your blog. I am learning a lot from you and really appreciate it. I have one question on your procedure, however. When working with "The Universal Color of Light", is this done on a dry layer or into wet paint as you do with the color (bands)? Thank you in advance!
I always paint into a wet surface.
That is - when I begin, the surface is dry - so I match the paint underneath with a thin scumble of paint and liquin - and then I paint the light into that. I think of this process a "buildinglight" as it is almost sculptural in the way it feels.
The reason I let my paint dry is that when I get something "right" I simply don't want to mess it up and then struggle to regain old ground.
If I am working on a dry surface and I mess up - I just wipe it off and begin again building on the layer that is correct.
Dear Karin,
Thank you for your blog, it has been my teacher since have I found it.
I have few questions regarding glazing process,
1. Is this only way of doing glazes?
2. Do you apply this process only on skin tones or on the props as well?
3.When you are building light do you pull down the light on to the dark(shadow) areas as well?
Post a Comment