Showing posts with label How to make a reference photo. Show all posts

The Ideal Reference Photo for a Painting

Are you trying to make a good painting from a poor photo reference? If so, it might be time to improve your photographic skills. 

Bill Gekas can inspire you. He is an Australia-based photographer who has a real knack for portrait photos. And we can learn a lot about photos by looking carefully at his work.


His work is an homage to many Old Masters of classic paintings, including artists like Vemeer and Rembrandt.


Gekas recreates many mid-18th century settings that are inspired by the painted portraits of the Old Masters.


 He uses props and costume to fit the time period and duplicates the single source of lightthat the Old Masters used. (In other words, there are no cross-shadows from light coming from different directions.)


The self-taught photographer learned on 35mm film camera and has since turned to digital techniques. 


He uses "post-processing" (Photoshop) to put the final touches on each of his photographs.


These photographs are the result of hard work, experimentation, and a grand vision. 


His style is unique and is based on the Old Masters.


Bill Gekas has some sage advice: 

"Don’t be scared of taking certain elements from different works and molding them into something to call your own. You might like the lighting from a photo you saw somewhere, a prop from another photo, colors from another."

"The key is not to limit yourself with the excuse, ‘It’s all been done before.’ Yes, many things have been done before, but with some careful thought you can adjust a concept to give it your signature. Experiment!”


I think that any painter who wants to do portraits, really needs to experiment with photography. They need to learn how to produce a beautiful photo using a single source of light (by far the most important element in this entire post).


I know that so many artists claim "that you must paint from life." 

I say, "baloney to that and it isn't practical - or sane." For Pete's sake, Vermeer used the Camera Obscura? (One wonders if these folks want the beginner to fail?)

So, you have my permission to use a photograph for reference and you can quote me on my hotly contested advice. 

Not only do I photograph people for paintings, I photograph my still life. 

Because, for example, a peach left in a warm studio for a couple of days will attract flies - yuck. I say it's better to take the photo and eat the peach while it is still fresh.


Could you imagine any model sitting or standing still long enough for you to paint a portrait that is as detailed as an Old Master painting? 

It would be difficult for an adult - but for a child? Never ~ it might be considered abuse.


I'd predict that the expression of a sitter would quickly reflect boredom or annoyance in a very short period of time. 

Just look at the alert expression in these photos. It only takes a second to capture with a camera ~ but it is what you want for a portrait.

Drapes and folds that change each time the model moves would drive me insane.


Shadows are important design elements in a painting and need to be carefully and thoughtfully.


Often, I combine bits and pieces from multiple photos shot at one sitting. I seldom "get it right" in one shot - although the more I shoot, the better I tend to get. 

 Bill Gekas' beautiful 5-year-old daughter stars in his Old Masters' painting-like photos. I found them online here.

And before you ask~ NO ~ you cannot make paintings from another person's photo without his or her express permission. But you can study the process and work on making your own unique photos of people and still life to use as reference.

Happy shooting!

Artist Recreates Flemish Paintings In Airplane Lavatory


Artist Nina Katchadourian has a creative way of passing the time on long-haul flights.


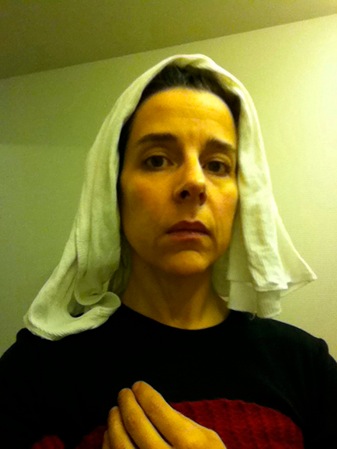
She recreates Old Master Flemish Paintings in a series she has dubbed "Lavatory Self-Portraits in the Flemish Style.”


She makes these photos while in flight - using only her cellphone- and the materials she finds around her.


In her own words:

"While in the lavatory on a domestic flight in March 2010, I spontaneously put a tissue paper toilet cover seat cover over my head and took a picture in the mirror. "


"The image evoked 15th-century Flemish portraiture. I decided to add more images made in this mode and planned to take advantage of a long-haul flight from San Francisco to Auckland, guessing that there were likely to be long periods of time when no one was using the lavatory on the 14-hour flight."


"I made several forays to the bathroom from my aisle seat, and by the time we landed I had a large group of new photographs entitled Lavatory Self-Portraits in the Flemish Style."


"I was wearing a thin black scarf that I sometimes hung up on the wall behind me to create the deep black ground that is typical of these portraits. "


"There is no special illumination in use other than the lavatory's own lights and all the images are shot hand-held with the camera phone."


This is Nina Katchadourian's website.


So, here's my point: "play" with your camera and your lighting. Use clothing and props in a unique and unusual way. Use these photos for inspiration...you have nothing to lose (except the boring old way of doing things).


Rules of thumb, #1 and #2:

"Clothes do not make the person - but they do make the portrait."

"Interesting clothing, props and lighting makes for an interesting portrait"


Any one of these would make a good reference photo for a painting.


A little imagination...


Lots of creativity...


By utilizing the materials at hand - not necessarily for their original function - but instead for a "look"...


Makes for some stunning and creative reference photos.


Too often I see portraits of people in "ordinary clothing"...but if you think "paintable clothing" - you'll end up with a better portrait.


By stretching her thinking beyond the ordinary, this artist created some very visually interesting and unusual photographs.


White is always a good way to "frame the face."


An interesting silhouette makes for an interesting portrait.


High contrast and definite shapes work in a portrait too.


All in all, I think that a great reference photo can be very simple - and very powerful.


And next time you're on an airplane and someone is hogging the bathroom...it could be an artist taking self portrait photos that look like an Old Master.

Or maybe not.

Why I Went to Nikon School


The average penguin knows more about photography than I do - or did before Nikon School.


If you want to be a portrait painter, it is important to learn to take a good photograph for reference.

I used to struggle with film but I am finding digital photography so much easier...and cheaper because I take so many pictures. I now "process" them on my computer and I don't have to pay to print the bad ones.


For me, photography is so much harder than painting - so when I found their brochure in my local camera store, I signed up and went to Nikon School for a weekend. They hold classes all over the country and the schedule with all the details is on their website.

I had to travel to Boston and spend the night since it is not an easy commute from New Hampshire.


The instructors did a First Class Grade-A job and the two classroom days flew by quickly. They answered all of my questions and I really learned a lot. I have a Nikon D2X and there is so much on it that heretofore has been a great mystery to me.

And wonder of wonders - I now take better pictures! In hindsight, I should have signed up for Nikon School years ago.


These were the courses:

Saturday: Introduction to Digital SLR Photography

The ideal starting point for new digital camera owners and anyone considering digital SLR Photography will acquaint you with the basic techniques and terminology of this popular imaging format. Geared for beginners and amateurs photographers this course addresses photographic fundamentals and creative techniques that help you get great shots. It also explains basic settings on your camera, what lenses to use, how to download, edit and store all your great digital images.

Sunday: Streamlined Workflow Techniques

Learn about current industry trends, technology advances, and using various types of software to assist you in expressing your photographic creativity and help streamline the entire digital workflow process. The course includes editing, archiving, color profiling, and printing techniques.

These were my wonderful instructors - mouse over their names and check out their work:


Bill is a professional photographer primarily involved with travel and location-oriented assignments. With over 35 years experience in editorial, corporate and commercial photography, he is also a photography instructor and consultant. A former member of the Nikon Professional Services tech team, Bill taught at the Nikon School for over ten years. He is currently an associate with Blue Pixel, a major digital imaging consulting firm.


A professional photographer for over 25 years, Reed started in studios, then worked at newspapers and now freelances out of Kansas City. He has been shooting digital since 1996 and teaching digital photography since 2000. Nationally recognized as an expert on digital photography, Reed has helped over 30 U.S. and Asian news organizations ease their transition to digital. He is also a founding member of Blue Pixel, a major digital imaging consulting firm.

Some Lighting Q and A


Vanessa wrote and asked me some questions about the lighting equipment I use for making photographic reference material for a painting. (Her Q's in grey and her original post here). 

I thought that a public answer was a good way to clarify and expand some more information with all of you.

Vanessa: I need one light source strong enough for head and shoulder that can also softly fade down a full-length dress should I need it to.


Yes, I think that a single source of light the best way to photograph a subject for a reference as in the photos above and below. Whether it is a full figure or just a head, the light needs to flow from top to bottom.


Vanessa: I have been looking at a cool florescent daylight and stand with 4 150, or 250watt bulbs - it has a 44 x44 inch soft box. 


Some of these light can be off or on. Britek Pro 5000 produce these and sell them on www.lincoinc168.com (as in above photo).

I have a soft box and the lighting is good. However I quit using it because it doesn’t work well when I photograph children who seldom sit still (or adults who fidget).


Right now I’m shooting with a Nikon Speed light which acts like a strobe in that it freezes action, allows for a lower ASA/ISO (film speed) and a sharp focus.


I prefer a Nikon wireless speedlight commander SU-800 (above) which clicks into my camera and automatically controls the speedlight's flash unit.

I shoot into or through a white umbrella which diffuses the light.


For a small subject – like my Day Lily Still Life above – I sometimes use a hardware store clip-on light holder with a florescent bulb. This makes it easier to adjust, see and compose shadows as important design elements.

Really fancy complicated equipment can be overkill. My best advice is get clear about what in particular  you really need and go for the easiest and cheapest way to make that happen.

Vanessa: Firstly, do you like florescent for portrait photos?

Yes, fluorescent light is more diffused and thus creates a softer shadow. 

I find that my digital camera makes adjusting color a lot less fussy than it was when I was using my old film camera.

Note: I paint using overhead color-balanced fluorescent lighting so my hand does not cast a shadow on my painting surface.

Vanessa: Secondly, in your use of florescent would this light source be powerful enough - as it is not a strobe – what you see is what you get.

Yes, I have used florescent lighting for a figure - but the person must sit still. I was getting way too many blurry shots. But on the other hand, it is easier to see and setup compositional shadow elements when the light source is steady.

But because I now use a speedlight, I make a few test shots in order to properly position my light. When I shoot in my studio, I have a general idea of where the light work best as I have done it so many times.


On location shooting, I often test the lighting with a model before the scheduled shoot. As in the above photo, you can see that there are many ways to light a subject and all of them are probably "correct."

However, as a rule of thumb, it is probably a good idea to have the light positioned on the upper left side of the model - it usually works best there and is a good starting point.

Walk around a museum. Look at the lighting the Old Masters used. You can learn a lot from that.

Also, please note that I use a neutral background drape to shoot my subjects.

When I need a specific background, I shoot that separately and paint it in behind the subject. Getting the background and the foreground “right” is too difficult for one shot - at least for me.


I photographed the model above in my studio using my speedlight. I took many photos of the  background separately and combined some of the elements in order to portray the "character and feeling" of the location.

Vanessa: Thirdly, I would think it would be easier to concentrate on composition, expression, if one is not messing with lighting connections and strobe. Would you agree?

Yes definitely. Once you figure out how to use your equipment, you can easily set it up and use it without much of a fuss. But of course there is a learning curve with all new equipment.

Vanessa: Would you advice that at 30 lbs it might be too heavy for taking on location?

Basically I'm lazy. I like my equipment to be small and lightweight (think airline travel nowadays). My Speedlight and Commander are small enough to fit in my camera case. 


My light stand (model above) folds up along with the small size umbrella and will easily fit into my suitcase.

If I need to bounce light into a shadow area I can use any white object like a piece of paper, poster board, white sheet, etc.

Because I shoot in ambient light (as opposed to a darkened room) I usually don’t need to do this and my speedlight will give me the compositional shadows I need.

I just remember to take a few test shots, download them to a computer and take a peek to see what is happening with my shadows. 

Vanessa: Still lapping up your teaching and loving it.

Thanks, I hope it all helps.

The following pictures are examples of lighting that I like. I include them because it is easy to see the simplicity of it all on a monotone statue.


Don't forget that interesting clothing makes for an interesting painting.


I always try to aim the strongest light on the forehead and let it gently wash down the figure.


With a film camera I had trouble shooting a full figure because I needed to back up away from the model in order to lessen the lens distortion.

With my digital camera I can stand much closer to the model and don't need as large a space to shoot in.


Remember, in general,your light ought to be placed so that it falls strongly on the forehead of the subject being photographed.


You can see that Rubens painted the strongest thickest light on his daughter Clara's forehead.