Why I Am A Studio Painter


When it comes to painting landscapes, I prefer to take photographs of beautiful places and then go back to my comfy studio and paint.


I stood in the mud on a drizzly day to get the reference photo for the painting above. I'm a wimp when it comes to "roughing it."

I fell in love with this little video of Tony Pro and Jeremy Lipking the minute I saw it:


So far my adventures in plein air painting have been a disaster. Who knew that bugs loved wet paint so much? They took my industrial strength "Deep Woods Off" as a party invitation. 

Rain, lightning, wind, sunburn, and no bathroom...ick.

My last effort to paint outdoors cured me: a sudden gust of wind blew a very wet paint-loaded canvas off the easel. As I struggled to catch it, I stepped in my paint thinner. I swear that more than one annoying sarcastic squirrel laughed at me.

Now I think it is funny but this is really why I am a studio painter.


As I recall, the above painting involved a ferocious battle with mosquitoes and I cut and ran right after I snapped the reference photo.

I keep an inexpensive digital camera in my car at all times because I never know when I'll see just the right lighting, cloud formation, shadow pattern or simply an amazing tree.

I especially like "weather" - the moisture-laden air, clouds before the rain, the clearing after the storm, mists, vapors, fogs, smoke and hazes. 

The mysterious colors of dawn. dusk, twilight and moonlight are better captured on location with my camera instead of my brush.

It only takes an instant to snap a picture. I appreciate the luxury of painting long hours in my warm, dry, bug & wind free indoor studio.

Candid Shots From The Campaign Trail


This is NOT meant to be a political blog...but this election has been so very important to me personally.


I just can't resist posting these pictures - it gives us a tiny peek into the very human and everyday aspects of a campaign.


It's been such a long journey and I (along with a zillion other volunteers) proudly worked to help make this happen.


It's true that every election is significant. 


But it's also true that it's impossible to exaggerate the special significance of this one.


The days of racial divide is gone forever. 


From now on, when people around the world hear us say that we believe all Americans are created equal, with equal rights and opportunities under the Constitution, they'll know we really mean it.


I will get back to painting again, but right now I am still blown away by the results of this election and haven't "calmed down" yet...it still makes me cry to think about it.


On the domestic front, we will soon have a president who believes in: civil rights; women's rights; gay rights; workers' rights; universal health care; protecting the environment; and making our schools, again, the best in the world. 


On the global front, we will soon have a president who believes in: ending the war in Iraq, obeying international law, leading the fight against global warming, favoring diplomacy over bombs, and working with our allies as a partner rather than a schoolyard bully.


It's a new day and a new beginning. 


I've never been so proud to be an American.

1.20.2009


On this date America will finally say goodbye to #43 and hello to #44.

"When small men begin to cast big shadows, it means that the sun is about to set." 
Lin Yutang


Arthur Miller liked to say that the essence of America was its promise. 

"At the end of the evening, the electoral vote count was 349 for Obama, 148 for McCain.
Or, as Fox News says....too close to call."
-David Letterman on election night

Seriously though, the final tally wasn’t even close. Democracy worked and America should be proud.

A New Day Dawns for the Arts


Congratulations President Elect Barack Obama!


"Change will not come if we wait for some other person or some other time. We are the ones we've been waiting for. We are the change that we seek." 
Barack Obama


Government involvement in the arts is like the porridge in the Goldilocks-Three Bears story. It has to be "just right." 

Obama is brainy enough to get the support going toward education so that young people begin to know and appreciate the arts once more. Then, perhaps sometime later, free enterprise can truly kick in--yep, it works in the arts too.

Obama wants to increase funding for the National Endowment for the Arts and change the Federal Tax Code for artists. 

He has ideas like sending out "Artists Corps" to underprivileged schools and communities, expansion of public-private partnerships to increase cultural education programs, cultural diplomacy and the inclusion of foreign talent, less inward-looking xenophobia all 'round, as well as health care for artists.

Obama also backs Senator Patrick Leahy's "Artist-Museum Partnership Act," allowing artists to deduct the fair market value of work given to charitable institutions. We might hope that this enlightenment may shine on fundraisers too.

Positive change in this last area would do wonders for charities. Fundraisers would attract better and more valuable art, raise standards, and would give relief to perpetually beleaguered artists. Think of the value to educational institutions alone.

"It is unprecedented," says Robert L. Lynch, CEO of "Americans for the Arts," a Washington-based arts advocacy group. "No presidential candidate in recent times has addressed cultural issues in such detail."


Student Critique - Lessons in Light and Shadow


"I always paint what I know and not merely what I see."
Karin Wells

I am so grateful to have permission to use a student work to critique in order to illustrate a couple of the fundamental principals of painting. 

This is NOT a critique of the drawing - that is another subject. But you can see how easily the drawing will be to correct when the principals of light and shadow are correctly applied.

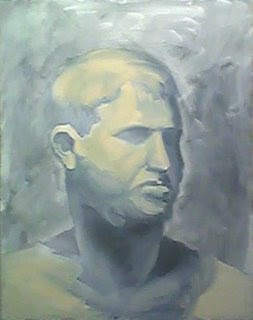
THE ORIGINAL STUDENT WORK:


This is the original work - a quick life study in warm and cool. The student used Payne's Grey, Raw Sienna and Titanium White.

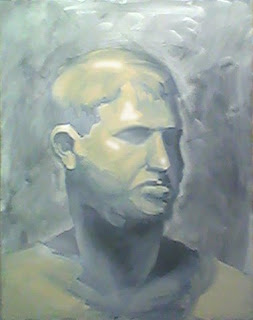
WHEN A SHADOW FALLS ON THE LIGHT SIDE IT WILL BE LIGHTER:


This is a hard one for most people to understand so I'll try to make the steps duck-soup simple.

Each object has a shadow side and a light side. 

So I added a shadow to the shadow (right) side of the forehead where there was none. 

Because the light comes from the upper left, I lightened the dark shadow on the shoulder on the left...because, given the light, I didn't think it could have been a dark "cast" shadow.

IMPORTANT: When a shadow appears on the light side of an object it will appear lighter than any shadow on the shadow side of the face (as illustrated with a heavy hand above).

Accordingly, I lightened the left eyesocket and all down the light (left) side of the face and neck.

IMPORTANT: No shadow ought to dramatically disrupt the flow of light on a lighted plane. Or, the light will illuminate whatever shadow it surrounds.

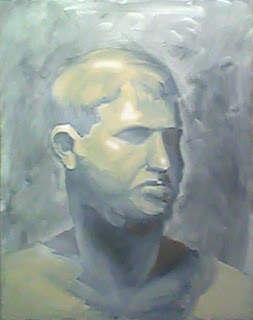
WHEN LIGHT FALLS ON THE SHADOW SIDE IT WILL BE DARKER THAN ON THE LIGHT SIDE

So keeping this in mind, I darkened both the light that fell on the cheek on the shadow side of the face and the light on the lip as it entered the shadow side of the face.

The value of light and shadow areas are not equal and are determined by where they fall. 

HIGHLIGHTS ARE COOL:


Highlights need to be cool. The term "warm and cool colors" are relative - often determined by what surrounds them.

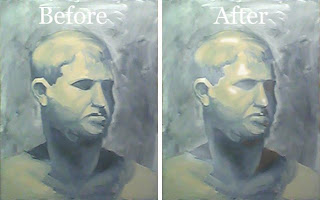
The general light is always warm and the student got it correct here. However, highlights are always lighter and cooler (as added to the original pix above via Photoshop) and it is the layering of warm and cool that will create form.

IMPORTANT: It may help you to think that a highlight will reflect the white light of the sun.

CAST SHADOWS ARE WARM (you can make them colorful and hot):


Deep shadows (aka, cast shadows) are warm - and if you make them hot - they don't even have to get too dark. I added a little orange into the deep shadows above to illustrate this. 

Warmth can be glazed or painted thickly. Sometime a thin (subtle) glaze of cadmium orange will breathe a little life and fresh air into a dead dark shadow. 

If I were correcting this painting with real paint I would use a glaze of raw sienna to warm up these cast shadows (eyesocket, bottom of nose, and under the chin on the shadow side of the head).

LOSE AND FIND EDGES (shown above)

All the edges on this original work are "found" so I "lost" a couple of edges when I changed the light/shadow ratios to facilitate the integration of background and foreground. Adjusting the  value of either the background or the foreground is a good way to "lose" an edge.

 The student can correct this with a brush with a heckuva lot more finesse and subtlety than I have with my clumsy Photoshopping efforts.

BEFORE AND AFTER COMPARED:


See how much more "sculptural" this painting has become? It suddenly appears as if the drawing has been "corrected" - but it wasn't (you saw exactly what I did, eh?).

Merely following some very basic principals of light and shadow will go a long way to painting more accurately (and certainly more easily).

Painting is Duck Soup Simple when you know how.

"Knowing what you're looking at makes painting so much easier."
Karin Wells

A Painter's Approach to "Blush"


If you are going for a realistic look in portraiture - ignore everything you know about applying makeup!

Beauty tips do NOT apply to the painting of a portrait.


Blush the cheeks with red, but keep it away from the nose and keep it low on the face - right down to the jaw line. 


My apologies to the Mona Lisa for using her face as a color map to show where the red really should go. 


Don't put any red on the forehead or the neck - be mindful of color banding as shown so well in George above.


Add your reds directly to the wet paint on your canvas - don't mix it first on your palette  first.


The nose and nostrils are warm.


And you can add some red on the upper lids of the eyes and in the inner corners and along the top of the lower lid.


You can add red from the lower jaw line right up to (but not beyond) the eyebrows.


Add lots of red to the ears.


You can add even more red to the shadow side of the face.


When you have blended the red in, the effect should be fairly subtle.


You don't want to add so much red that your face looks sunburned. Also, don't cover large unbroken areas in red or else it will look fake. 


You want to leave some areas red-free so there is some variety.


You can do the same thing for the hands and feet that you did for the face. You can use use quite a bit, especially on the soles of the feet, palms of the hands and fingertips. 


Red likes any place on the human body where the bone comes near the surface - elbows, knees, knuckles.


Sometimes it is easy to add more red to the face of a child than an adult.

I use a warm and a cool red: Indian Red and/or Alizarin Crimson Permanent.


Gosh I Wish I'd Said That


Every now and then something strikes me as "just right." I got an email today from Robert Maniscalo that promotes his new book, Point of Art. 

I really liked these particular quotes:

"Whether you are painting realistically or not, it is beneficial to begin to see shapes and patterns abstractly.

The best realists are great abstractionists. We must learn to distill forms down to their essence. 

Representational painting is about values. When you can master increments of value like a musician masters scales, then you can paint anything you see."


Tickling Your Punny Bone


She was only a whisky maker, but he loved her still.


How To Turn An Edge


To make your painting look "real" you have to create the illusion that the edges of objects turn back into space.

Think of a landscape with "blue" mountains in the distance. The further away from the eye an object is, the cooler (bluer) it gets.

It doesn't matter if the object is close and small and not very deep - the principal is the same.


The edges (above) are not turned. I saved them for last so I could show this mini-demo. I usually turn an edge as I paint.

Edges must be "cooled" in order to turn. It is usually so subtle that it isn't easily seen but your brain will suddenly recognize the realistic look of a three-dimensional form. 

But if you don't turn those edges, the object will look like a cutout pasted onto a flat surface...and it won't look like a believable realistic form.


The edge of the sleeve in the photo on the right is not turned yet. 

The left side shows a turned edge. Because it is so darn difficult to photograph and see on this blog, I  had to enhance the process with Photoshop.

You can use several methods to turn an edge. 

Add a thin cool blue glaze...enough to fool the eye but not enough to add color. I've seen Velazquez do this.

OR

When the paint is still wet on the object you're painting, add a dab of ivory black (or blue) to cool the object's edge and it will magically turn back into space.


The edges of all the objects (clothing, folds, hands, legs, hair, etc.) in this painting have been turned. 

It is tough to see here but the effect is almost magical when you're standing in front of the painting.

I really think that the Old Masters are ultimately the BEST teachers of realistic painting. When you know what to look for, you will be able to see it. 

MY BEST ADVICE: Take a trip through any good museum and observe how many different ways the Old Masters used to turn those edges.